This ambitious rover project is a childhood dream of mine of building a small Sojourner like rover, fitting it in a rocket, and launching it out into a field where it will survive a couple of nights, or weeks, or however long it'll last. This blog is to document all the lessons learned, occasional failures, and all the fun along the way. To see how this all got started, go to my first post in May 2013.
These past couple of weeks have flown by! 2 more weeks and I stuff Inspiration into a box and ship it out to Pasadena for SpaceFest. I've made huge strides on this project but very few pictures to show for it. I'll start off with this one:
I realized that I can sketch on my laptop using my stylus and Autodesk sketchbook. And I also learned I'm not very good at sketching. Kinda fun though!
Next, I tested the 7.4 volt LiPo battery I got from King Kong Hobbies just down the road from me. It's 1/3 of the weight of the 9.6 volt NiMH pack I was using and should drain more consistently. I wasn't sure if it would power all 6 motors, the 9 volt camera, and the 9 volt metal detector. So I tested each one individually and found that each system can be run off of the 7 volts from the LiPo. In fact, here's me testing the camera, motors, and suspension at the same time.. in dirt!
The solar panel wasn't actually hooked up on that video because I still needed to wire the power distribution buss and test to see if the battery could be charged with a solar panel. Here's a pic from a ten minute charging test:
After 10 minutes, each cell had gained .02 volts so this so far confirms my original figure that it should take around 8 hours to charge. I'm still thinking the battery should provide about an hour of drive time. Hopefully I'll get to that test this week. If the weather lets me.
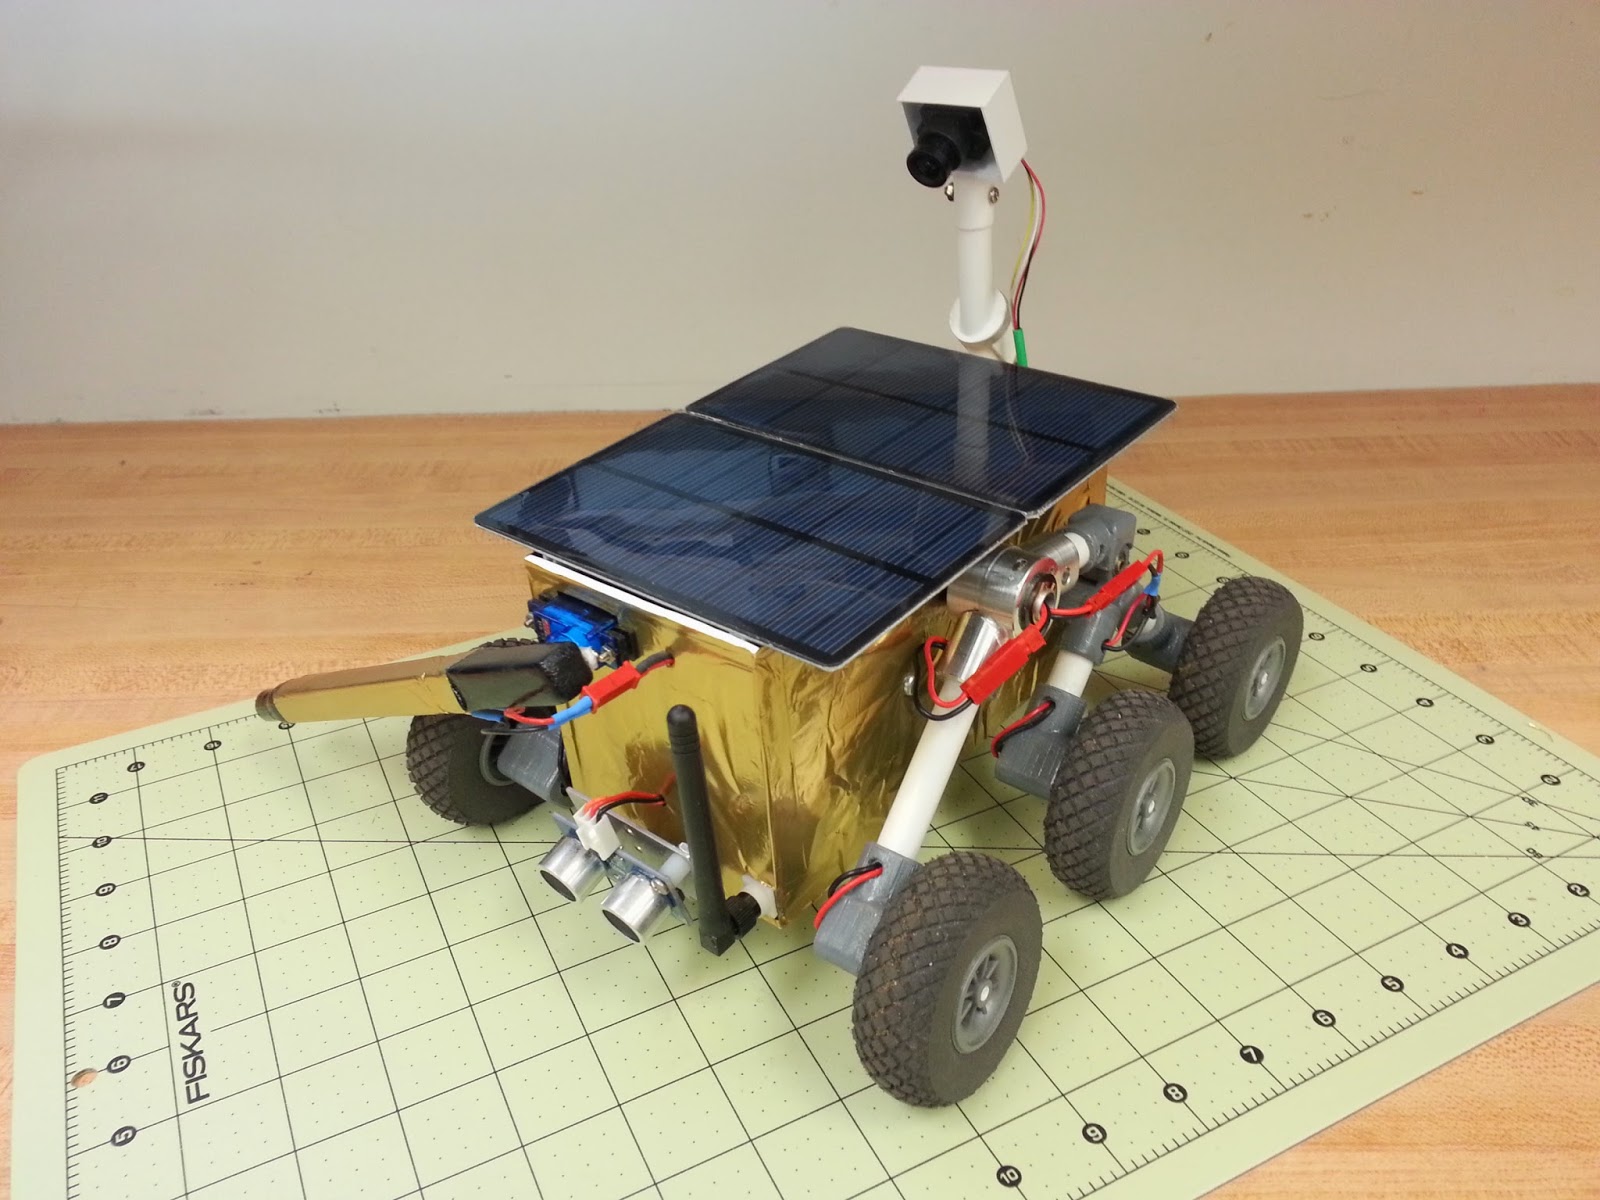
Next I worked on the metal detector. I got the code working, with some help from my classmate Bjorn, and so now when I press 'i' on the keyboard, the Arduino returns the value of "Metallic" or "Non-Metallic". The actual arm that I have completed in this picture is actually balsa wood with the end of the metal detector probe in a rubber cap at the end. I cut the balsa wood where the black and gold part meet, put a small hinge on it, and glued some magnets inside so now it can fold back against the right side of the body and snap into position after landing. The gold is from a gold party balloon that Cristin found at the dollar store. I wanted to make the rover look more like a real NASA rover so I decided to wrap the rover in that. Also, the plan was to keep the sun from cooking the inside of the rover like how the inside of a car gets.
So with Inspiration fully assembled and wrapped in "Mylar", it is ready for more tests and more coding. Still to come will be coding the camera and metal detector to turn on and off with a command in order to conserve battery life and speed charging times. I might even dabble in the GPS this week but I'm kind of thinking I won't have time to get it working before SpaceFest. Hopefully it'll happen. But I will definitely get it outside in the sun soon so stay tuned for those videos.
Oh and I added more to the Inventor drawing that I've been working on. Maybe this summer I'll teach myself how to animate the parts and render so it'll look really professional. I should probably get the sonic range finder drawn in there too I suppose.
Anyways, thanks for the interest in Inspiration and its, at times, slow journey to glory. We're almost there! Stray Robotics will have a table at SpaceFest along with business cards, a banner, a large printed PDF of all of Inspiration's abilities, and of course Inspiration will be maneuvering through a small rock field on the table and possibly showing off a little. Stay tuned! More to come!
This past week I have been incredibly busy getting Inspiration rolling. I cut the aluminum tube down to length and fit it to a U shaped piece of aluminum which will serve as the load bearing part for the body and all of it's components. I then figured out where I wanted the grooves for the retaining rings to go. Putting these grooves in turned into a fairly odd way of machining.
Since I didn't have a lathe handy, I used the next best thing.. a drill press. With a good sharp eye and extremely steady hands, I took a small saw with a .030 blade and held it up to the aluminum tube where I wanted the grooves cut. It actually worked surprisingly well and the .025 thick retaining rings fit in perfectly.
After I got the tube cut and the chassis put together, I took a few pictures of it sitting next to the, now too small, body and then another with a wheel up on it showing the amazing capabilities of Don Bickler's rocker-bogie suspension system.
Once I got it all wired up, I just had to get it outside to do some "victory doughnuts"
It was really nice to finally get it outside in the dirt since the entire time I've been working on this suspension, there has been at least a foot of snow on the ground. There was one issue though with turning around on higher traction surfaces. You'll see in the video how one wheel comes up off the ground. If I continue rotating, the entire suspension side will roll over on the tube and leave the rover kind of laying on its side. So while I've been thinking about how to fix this problem, I started work on the new body.
I went down to the Hack Factory and used their laser cutter to produce some nice accurate cuts and holes for all the wires and screws.
Once I put all the cut pieces together, I mounted the body to the aluminum U with some screws so now the body can be easily separated from the chassis by turning out 4 screws. Here's a couple pics with most of the electronics inside:
This weekend, I set to work on the metal detector arm and reprogramming the speed of the wheels while turning which seems to solve the rolling-over-suspension problem. And just a few hours ago, I finished wiring up one side of the rover so now if I needed to take an arm off for some reason, I just unplug the wires and pull the retaining clip and the whole suspension arm will slide off. A nice modular design just in case I end up designing another system, it can be easily swapped or if I needed to replace a motor, it will make it that much easier.
Next up is wiring the other side and finish the metal detector arm. I also have some more wire harnesses to add to the camera system and the battery.